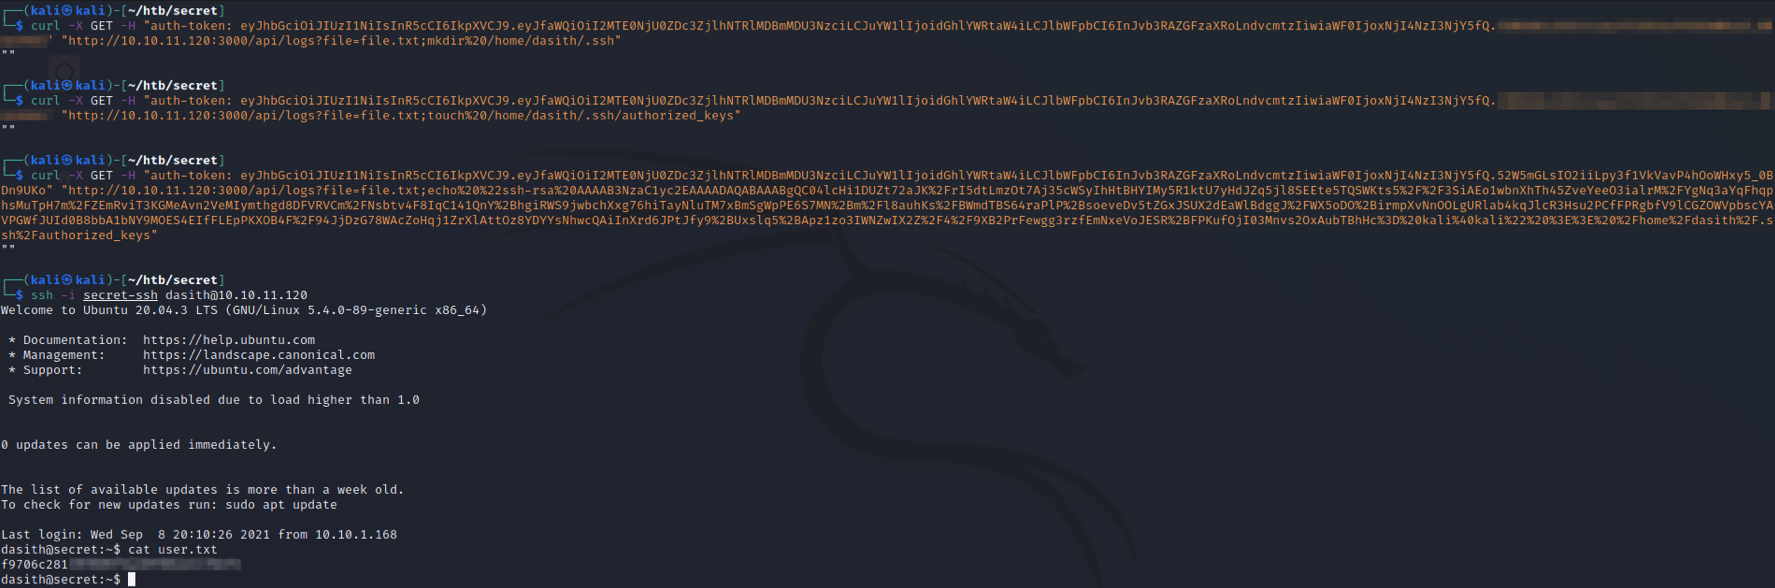
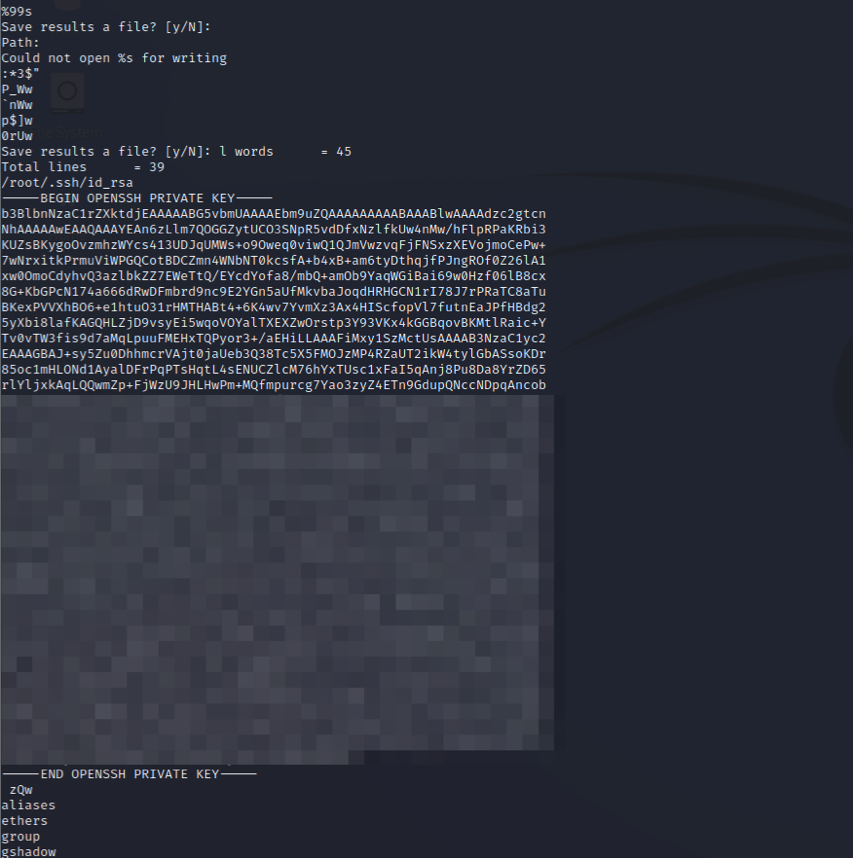
Today we’ll be going over the HackTheBox machine titled Secret. This is an easy machine with an initial attack vector that comes from a mistake that developers should be extremely conscious about. The privilege escalation is a bit interesting and showcases the power of having unrestricted file read privileges. Let’s dive in.
We’ll start off with some nmap scans to see what services we are dealing with.
Do a baseline scan with scripts and service detection.

Also do a scan for all TCP ports to make sure we didn’t miss any.

Looks like there are a couple of web services. Let’s first take a look at what’s running on port 80.

It’s a website for something called DUMBDocs. If we navigate to port 3000 (http://10.10.11.120:3000), we see the same home page.
Going back to port 80 and scrolling down on the homepage, we see a button for downloading the source code. Hover over it to view the link: http://10.10.11.120/download/files.zip

Sounds interesting, so we will go ahead and download it with wget and unpack it with unzip.


Looks like we have just downloaded the source code to the web app. Before we get too deep into this, let’s take a step back and look at the website. There is a section called “Introduction” that talks about using an API-based auth system and JWTs. Let’s click to read more.

It’s a quick read, and there are a few different parts we want to pay attention to here. The docs explain that a successful login request will return a JWT. If you are an admin user when logging in, your JWT that gets returned can be used to access the private route.


There is a username/password combination and a token included in the documentation. We can try them for a quick win, but it looks like the developers did their due diligence in making sure valid credentials weren’t included in the public docs.

Let’s go back to the source code. If we list all files in the local-web directory, we can see that there is a .env file and .git directory. This means that this source code is linked to a git repository.

Furthermore, we can inspect the contents of the .env file and the commit history. Notice that the current .env file has TOKEN_SECRET set to a dummy value and that one of the commit comments says that the .env file was removed for security reasons. This implies that the developers may have committed an actual secret used in this environment to the repo at one point in time. Let’s investigate.

With a little help from Google, we can find out how the commit history can be viewed using the git log command: https://git-scm.com/book/en/v2/Git-Basics-Viewing-the-Commit-History. Let’s try this on the web server’s git repo and dig through the past entries, starting with the last five.
git log -p -5

The first entry that pops up is interesting because it reveals two things. First, the admin account we want to try logging in as is called theadmin. Second, there is a /logs API endpoint that will allow theadmin to read logs. This is important because we can see that there is a possible command injection in the code for this endpoint. It appears to be taking user input for a filename and placing it into a git command, which is then executed it at the OS level. There doesn’t look to be any sanitization of the user input in this code, so it is most likely vulnerable to command injection.
So how do we become theadmin? Keep scrolling down in the commit history using the arrow keys, and we see a value for the TOKEN_SECRET was in fact committed to the repository at one point. This is great news for us. We can try to use this to forge a JWT for theadmin user.

With the help of an online JWT tool, we can create the token needed for auth: https://jwt.io/#debugger-io
There is actually a section in the DUMBDocs documentation that uses this exact tool, and it even has a screenshot specifying all of the values we need to use – except for the secret. This is not a problem for us, since we were able to retrieve it from the git commit history.


After forging the token, we can check if it works using an API call to the private route.

Success! The message has told us that we are theadmin. Now to look into the command injection. Recall that the /logs API endpoint took a file paramenter that looked injectable. We can infer that this server is Linux/Unix, so we can try a simple payload to see if it works. Remember that there didn’t appear to be any input filtering on the backend, so any characters that we use should be okay.

Sending a request to the /logs endpoint without a file results in an error. Passing a fake filename and the id command looks to execute that command and show what user the web application is running as on the server, which in this is the user called dasith. With this information, we can conclude that command injection is working. Our next step is to see if we can get SSH access (recall that port 22 is open from the nmap scans).
Personally, when I see that we are executing commands as an actual user account (not www-data or similar), the first thing that I try is to drop an SSH key. We’ll generate an RSA key pair and then view the public key so that we can copy it into some commands that place it on the remote server. Note that your key pair will be different from my key pair, and you’ll need to use the keys that you generate in order for this to work correctly.

mkdir /home/dasith/.ssh
touch /home/dasith/.ssh/authorized_keys
echo "ssh-rsa AAAAB3NzaC1yc2EAAAADAQABAAABgQC04lcHi1DUZt72aJK/rI5dtLmzOt7Aj35cWSyIhHtBHYIMy5R1ktU7yHdJZq5jl8SEEte5TQSWKts5//3SiAEo1wbnXhTh45ZveYeeO3ialrM/YgNq3aYqFhqphsMuTpH7m/ZEmRviT3KGMeAvn2VeMIymthgd8DFVRVCm/Nsbtv4F8IqC141QnY+hgiRWS9jwbchXxg76hiTayNluTM7xBmSgWpPE6S7MN+m/l8auhKs/BWmdTBS64raPlP+soeveDv5tZGxJSUX2dEaWlBdggJ/WX5oDO+irmpXvNnOOLgURlab4kqJlcR3Hsu2PCfFPRgbfV9lCGZOWVpbscYAVPGWfJUId0B8bbA1bNY9MOES4EIfFLEpPKXOB4F/94JjDzG78WAcZoHqj1ZrXlAttOz8YDYYsNhwcQAiInXrd6JPtJfy9+Uxslq5+Apz1zo3IWNZwIX2Z/4/9XB2PrFewgg3rzfEmNxeVoJESR+FPKufOjI03Mnvs2OxAubTBhHc= kali@kali" >> /home/dasith/.ssh/authorized_keys
Once the public key is copied, use the private key to SSH into the server as the dasith user. We now have the user flag.

When doing some local enumeration on the server, we find an interesting SUID binary along with some C code in the opt directory. If we run the count SUID binary, it asks us to provide a file and then outputs some statistics about that file. There is also an option to save the results, which does nothing more than save those stats to a file. Note that the file read appears to be unrestricted since we are able to get stats for root’s SSH key. However, the file write appears to be restricted since we are unable to write to the opt directory and have to write to dasith’s home directory instead.

Next, we can examine the code.c file. Upon inspection, it appears to be the source code for the count binary. The main function has some important info for us. We can see that it has a setuid function that drops root privileges before it writes the output file, which aligns with what we observed earlier. If we look one line below, there is a comment stating that the code enables core dump generation. Let’s find out what that line is doing exactly.

The prctl man page helps explain the significance of this line of code: https://man7.org/linux/man-pages/man2/prctl.2.html. We can see that this attribute is normally set to 1 (true). However, one of the cases where it is reset to 0 (false) is if the process executes an SUID program. This applies to our scenario since the count binary is an SUID binary. Lucky for us, this line is setting the dumpable attribute back to 1 (true). If we can get the program to crash, we can potentially read data with root privileges, such as the root SSH key we tried to read earlier.

We will need two SSH sessions to get this to work. This is because one needs to be used to run the count SUID binary and the other needs to kill that process while it is running.
Here we can see that the top SSH session is used to run the SUID binary which then reads the root SSH key. Before entering a filename of where to save the results, we will switch over to the other SSH session and find the PID of the count process. We issue the kill command with the SEGV signal, and in the top SSH session, we will see that a seg fault occurred (note that it says “core dumped”). See this for a list of kill signals: https://www.techonthenet.com/linux/commands/kill.php. I picked SEGV because it causes a core dump that is not likely to fail.


Next, we will see if the core dump was saved and unpack it so that we can more easily search it. We can run a command to find that the kernel is Ubuntu, and a quick Google search reveals where we can find crash reports on Ubuntu and how to read them: https://askubuntu.com/questions/966407/where-do-i-find-the-core-dump-in-ubuntu-16-04lts


The CoreDump file is the one that we want to check for human-readable strings. If we scroll down, we can see what looks to be the root SSH private key. Bingo! We’ll copy that over to our Kali machine so that we can use it to login.


Note that after copying, you may have to issue a command in vi like I did to remove any trailing spaces. To do this, enter command mode by typing the colon character “:”. It will show that you are in command mode at the bottom of your terminal window. Type this string %s/\s\+$// and press Enter. Once it is complete, it will give confirmation towards the bottom of the terminal window.

Finally, restrict the permissions on the private key we just copied to avoid error messages and use it to login. We are now able to read the root flag and have completed the box!

Key Learnings
- Never commit secrets, passwords, API tokens, etc. to a git repository or similar version control system. If an attacker can find these, they are able to use legitimate credentials to gain access to your environment and maneuver around using the existing user’s privileges.
- The core dump feature is disabled for SUID binaries for a reason. I am unsure how common this is in the real-world, but re-enabling the core dump seems like a bad idea. Having the ability to dump memory that we would not normally have access to into a readable place can be catastrophic, as seen in the privilege escalation for this machine.