CloudGoat is an open source tool (courtesy of Rhino Security Labs) that allows security professionals to create and learn from an intentionally vulnerable AWS cloud environment. If you’re familiar with pen testing labs such as HackTheBox or TryHackMe, this is basically the same concept but for AWS.
Resources for doing cloud pen testing are pretty scarce in today’s cyber security space and there’s no doubt that cloud technology is here to stay. As pen testers, we need to make ourselves aware of the many misconfigurations and vulnerabilities that this newer attack surface brings. With CloudGoat, we are able to do this with the cloud provider that currently holds the most market share, AWS.
In this series, we’re going to walk through what CloudGoat calls “scenarios”. These scenarios each have their own starting points, attacker end goals, and vulnerable infrastructure that can easily be created in an AWS account for us to play with. The CloudGoat GitHub repo has diagrams and cheat sheets for each scenario, if you become stuck. Because this tool takes a bit of initial set up, we’re going to use the rest of this post to run through that before diving into any of the actual fun stuff.
Installing Requirements
To get things started, we’ll want to check out the “Requirements” section of the README.
REQUIREMENT:
“Linux or MacOS. Windows is not officially supported.
Argument tab-completion requires bash 4.2+ (Linux, or OSX with some difficulty).
Python3.6+ is required.”
I’m going to use an up-to-date version of Kali Linux for working through these scenarios, so that checks off these first two reqs pretty easily. If you don’t have a lab VM, check out one of my previous posts on how to do that. If you’re already running Kali Linux or some other distribution, you can double-check your bash and python versions and update your distribution as needed.
					┌──(mr-b4rt0wsk1㉿kali)-[~]
└─$ bash --version
GNU bash, version 5.2.0(1)-rc2 (x86_64-pc-linux-gnu)
Copyright (C) 2022 Free Software Foundation, Inc.
License GPLv3+: GNU GPL version 3 or later <http://gnu.org/licenses/gpl.html>

This is free software; you are free to change and redistribute it.
There is NO WARRANTY, to the extent permitted by law.

┌──(mr-b4rt0wsk1㉿kali)-[~]
└─$ python3 --version
Python 3.10.7
REQUIREMENT:
“Terraform >= 0.14 installed and in your $PATH.”
Since I’m using Kali, I’m going to follow the Manual installation section of the installation docs for Terraform.
A quick note: I did attempt to follow the Linux -> Ubuntu/Debian section of the Terraform docs. However, “kali-rolling” is not an officially supported distro and you will eventually run into errors when trying to download the terraform package from Hashicorp’s repo.
					┌──(mr-b4rt0wsk1㉿kali)-[~]
└─$ cd Downloads/

┌──(mr-b4rt0wsk1㉿kali)-[~/Downloads]
└─$ wget https://releases.hashicorp.com/terraform/1.3.1/terraform_1.3.1_linux_amd64.zip
--2022-09-28 20:47:07--  https://releases.hashicorp.com/terraform/1.3.1/terraform_1.3.1_linux_amd64.zip
Resolving releases.hashicorp.com (releases.hashicorp.com)... 13.33.65.9, 13.33.65.21, 13.33.65.18, ...
Connecting to releases.hashicorp.com (releases.hashicorp.com)|13.33.65.9|:443... connected.
HTTP request sent, awaiting response... 200 OK
Length: 19450765 (19M) [application/zip]
Saving to: ‘terraform_1.3.1_linux_amd64.zip’

terraform_1.3.1_linux_a 100%[============================>]  18.55M  7.46MB/s    in 2.5s

2022-09-28 20:47:09 (7.46 MB/s) - ‘terraform_1.3.1_linux_amd64.zip’ saved [19450765/19450765]


┌──(mr-b4rt0wsk1㉿kali)-[~/Downloads]
└─$ ls -la terraform_1.3.1_linux_amd64.zip
-rw-r--r-- 1 mr-b4rt0wsk1 mr-b4rt0wsk1 19450765 Sep 28 09:00 terraform_1.3.1_linux_amd64.zip

┌──(mr-b4rt0wsk1㉿kali)-[~/Downloads]
└─$ unzip terraform_1.3.1_linux_amd64.zip
Archive:  terraform_1.3.1_linux_amd64.zip
  inflating: terraform

┌──(mr-b4rt0wsk1㉿kali)-[~/Downloads]
└─$ ls -la | grep terraform
-rwxr-xr-x  1 mr-b4rt0wsk1 mr-b4rt0wsk1   61235200 Sep 28 08:50 terraform
-rw-r--r--  1 mr-b4rt0wsk1 mr-b4rt0wsk1   19450765 Sep 28 09:00 terraform_1.3.1_linux_amd64.zip
Now that it’s downloaded, I can move it to my $PATH. Like the example in the docs, /usr/local/bin/ is already in my $PATH, so I will move it there.
					┌──(mr-b4rt0wsk1㉿kali)-[~/Downloads]
└─$ sudo mv ~/Downloads/terraform /usr/local/bin/

┌──(mr-b4rt0wsk1㉿kali)-[~/Downloads]
└─$ cd ~

┌──(mr-b4rt0wsk1㉿kali)-[~]
└─$ which terraform
/usr/local/bin/terraform

┌──(mr-b4rt0wsk1㉿kali)-[~]
└─$ terraform -help
Usage: terraform [global options] <subcommand> [args]

The available commands for execution are listed below.
The primary workflow commands are given first, followed by
less common or more advanced commands.

...SNIP...
Next, we’ll enable tab completion. My zsh config file already exists, so I’m only going to run the terraform command.
					┌──(mr-b4rt0wsk1㉿kali)-[~]
└─$ ls -la .zshrc
-rw-r--r-- 1 mr-b4rt0wsk1 mr-b4rt0wsk1 11040 Sep  2 23:03 .zshrc

┌──(mr-b4rt0wsk1㉿kali)-[~]
└─$ terraform -install-autocomplete
It should add these two lines to the config file. When doing these types of config file changes, I like to add a comment so I know why or how something was added, but this is purely optional.
					# terraform autocomplete install
autoload -U +X bashcompinit && bashcompinit
complete -o nospace -C /usr/local/bin/terraform terraform
The docs say that you should restart your shell after installing this, so just exit out of your current shell and launch a new one.
REQUIREMENT:
“The AWS CLI installed and in your $PATH, and an AWS account with sufficient privileges to create and destroy resources.”
We’ll follow the AWS docs for installing the CLI. Download, unzip, and install the file as they describe. It defaults to installing to a location in my $PATH.
					┌──(mr-b4rt0wsk1㉿kali)-[~]
└─$ cd Downloads

┌──(mr-b4rt0wsk1㉿kali)-[~/Downloads]
└─$ curl "https://awscli.amazonaws.com/awscli-exe-linux-x86_64.zip" -o "awscliv2.zip"
unzip awscliv2.zip
sudo ./aws/install
  % Total    % Received % Xferd  Average Speed   Time    Time     Time  Current
                                 Dload  Upload   Total   Spent    Left  Speed
100 44.8M  100 44.8M    0     0  12.8M      0  0:00:03  0:00:03 --:--:-- 12.8M
Archive:  awscliv2.zip

...SNIP...

You can now run: /usr/local/bin/aws --version

┌──(mr-b4rt0wsk1㉿kali)-[~/Downloads]
└─$ aws --version
aws-cli/2.7.35 Python/3.9.11 Linux/5.18.0-kali7-amd64 exe/x86_64.kali.2022 prompt/off
It looks like the docs have us install the file before mentioning an optional step to verify the integrity of the download (which should probably be done before installing). Whoops. Well, we can do that anyway as a sanity check.
					┌──(mr-b4rt0wsk1㉿kali)-[~/Downloads]
└─$ echo "-----BEGIN PGP PUBLIC KEY BLOCK-----

mQINBF2Cr7UBEADJZHcgusOJl7ENSyumXh85z0TRV0xJorM2B/JL0kHOyigQluUG
ZMLhENaG0bYatdrKP+3H91lvK050pXwnO/R7fB/FSTouki4ciIx5OuLlnJZIxSzx
PqGl0mkxImLNbGWoi6Lto0LYxqHN2iQtzlwTVmq9733zd3XfcXrZ3+LblHAgEt5G
TfNxEKJ8soPLyWmwDH6HWCnjZ/aIQRBTIQ05uVeEoYxSh6wOai7ss/KveoSNBbYz
gbdzoqI2Y8cgH2nbfgp3DSasaLZEdCSsIsK1u05CinE7k2qZ7KgKAUIcT/cR/grk
C6VwsnDU0OUCideXcQ8WeHutqvgZH1JgKDbznoIzeQHJD238GEu+eKhRHcz8/jeG
94zkcgJOz3KbZGYMiTh277Fvj9zzvZsbMBCedV1BTg3TqgvdX4bdkhf5cH+7NtWO
lrFj6UwAsGukBTAOxC0l/dnSmZhJ7Z1KmEWilro/gOrjtOxqRQutlIqG22TaqoPG
fYVN+en3Zwbt97kcgZDwqbuykNt64oZWc4XKCa3mprEGC3IbJTBFqglXmZ7l9ywG
EEUJYOlb2XrSuPWml39beWdKM8kzr1OjnlOm6+lpTRCBfo0wa9F8YZRhHPAkwKkX
XDeOGpWRj4ohOx0d2GWkyV5xyN14p2tQOCdOODmz80yUTgRpPVQUtOEhXQARAQAB
tCFBV1MgQ0xJIFRlYW0gPGF3cy1jbGlAYW1hem9uLmNvbT6JAlQEEwEIAD4WIQT7
Xbd/1cEYuAURraimMQrMRnJHXAUCXYKvtQIbAwUJB4TOAAULCQgHAgYVCgkICwIE
FgIDAQIeAQIXgAAKCRCmMQrMRnJHXJIXEAChLUIkg80uPUkGjE3jejvQSA1aWuAM
yzy6fdpdlRUz6M6nmsUhOExjVIvibEJpzK5mhuSZ4lb0vJ2ZUPgCv4zs2nBd7BGJ
MxKiWgBReGvTdqZ0SzyYH4PYCJSE732x/Fw9hfnh1dMTXNcrQXzwOmmFNNegG0Ox
au+VnpcR5Kz3smiTrIwZbRudo1ijhCYPQ7t5CMp9kjC6bObvy1hSIg2xNbMAN/Do
ikebAl36uA6Y/Uczjj3GxZW4ZWeFirMidKbtqvUz2y0UFszobjiBSqZZHCreC34B
hw9bFNpuWC/0SrXgohdsc6vK50pDGdV5kM2qo9tMQ/izsAwTh/d/GzZv8H4lV9eO
tEis+EpR497PaxKKh9tJf0N6Q1YLRHof5xePZtOIlS3gfvsH5hXA3HJ9yIxb8T0H
QYmVr3aIUes20i6meI3fuV36VFupwfrTKaL7VXnsrK2fq5cRvyJLNzXucg0WAjPF
RrAGLzY7nP1xeg1a0aeP+pdsqjqlPJom8OCWc1+6DWbg0jsC74WoesAqgBItODMB
rsal1y/q+bPzpsnWjzHV8+1/EtZmSc8ZUGSJOPkfC7hObnfkl18h+1QtKTjZme4d
H17gsBJr+opwJw/Zio2LMjQBOqlm3K1A4zFTh7wBC7He6KPQea1p2XAMgtvATtNe
YLZATHZKTJyiqA==
=vYOk
-----END PGP PUBLIC KEY BLOCK-----" > aws_cli_pgp_public_key

┌──(mr-b4rt0wsk1㉿kali)-[~/Downloads]
└─$ gpg --import aws_cli_pgp_public_key
gpg: keybox '/home/mr-b4rt0wsk1/.gnupg/pubring.kbx' created
gpg: key A6310ACC4672475C: public key "AWS CLI Team <aws-cli@amazon.com>" imported
gpg: Total number processed: 1
gpg:               imported: 1

┌──(mr-b4rt0wsk1㉿kali)-[~/Downloads]
└─$ curl -o awscliv2.sig https://awscli.amazonaws.com/awscli-exe-linux-x86_64.zip.sig

  % Total    % Received % Xferd  Average Speed   Time    Time     Time  Current
                                 Dload  Upload   Total   Spent    Left  Speed
100   566  100   566    0     0   1068      0 --:--:-- --:--:-- --:--:--  1067

┌──(mr-b4rt0wsk1㉿kali)-[~/Downloads]
└─$ gpg --verify awscliv2.sig awscliv2.zip
gpg: Signature made Fri 23 Sep 2022 12:54:02 PM CDT
gpg:                using RSA key FB5DB77FD5C118B80511ADA8A6310ACC4672475C
gpg: Good signature from "AWS CLI Team <aws-cli@amazon.com>" [unknown]
gpg: WARNING: This key is not certified with a trusted signature!
gpg:          There is no indication that the signature belongs to the owner.
Primary key fingerprint: FB5D B77F D5C1 18B8 0511  ADA8 A631 0ACC 4672 475C
As mentioned in the AWS CLI install docs, the warning message is expected and we can see that the signature is verified and that the fingerprint matches.
In order to use the CLI, you must have an AWS account. Since I already have an account, I’m not going to run through the steps to set one up. If you need to set up an AWS account, instructions can be found here. A few recommendations when doing this:
- Do not use an AWS account that is running any production environments or important projects. By design, deploying CloudGoat makes your account vulnerable to attacks. I recommend setting up an account for the sole purpose of lab exercises and experimental work like this. The 1 year of AWS Free Tier you get upon sign up should keep this low cost, if not free.
- Set up an IAM user as mentioned in the AWS docs. Do not use the root account for anything we are going to be doing here. It’s best practice to not really sign into the root account in general.
- Get in the habit of setting up all of your AWS accounts with Multi-Factor Authentication (including the root user).
Once we have the AWS CLI installed, an AWS account, and an IAM user with access keys provisioned, we can configure the AWS CLI.
Below is the example from the AWS docs. This command will create a directory called .aws in your user’s home directory. The information you provide the prompts will be stored in the config and credentials files within the .aws directory. I recommend picking the AWS region geographically closest to you.
					$ aws configure
AWS Access Key ID [None]: AKIAIOSFODNN7EXAMPLE
AWS Secret Access Key [None]: wJalrXUtnFEMI/K7MDENG/bPxRfiCYEXAMPLEKEY
Default region name [None]: us-west-2
Default output format [None]: json
REQUIREMENT:
“jq”
The link provided in the README takes you to page that makes it look like you must download jq as a file from their website. If you navigate to the Download tab, it mentions that it’s also available to install through package managers like apt.
					┌──(mr-b4rt0wsk1㉿kali)-[~]
└─$ sudo apt-get install jq
Quickstart
With all of the requirements installed, it’s time to move on to the set up of CloudGoat. We’ll want to start off by cloning the repo and installing the dependencies in the requirements.txt file.
					┌──(mr-b4rt0wsk1㉿kali)-[~]
└─$ git clone https://github.com/RhinoSecurityLabs/cloudgoat.git
Cloning into 'cloudgoat'...
remote: Enumerating objects: 4155, done.
remote: Counting objects: 100% (726/726), done.
remote: Compressing objects: 100% (270/270), done.
remote: Total 4155 (delta 526), reused 543 (delta 453), pack-reused 3429
Receiving objects: 100% (4155/4155), 13.91 MiB | 10.94 MiB/s, done.
Resolving deltas: 100% (1763/1763), done.

┌──(mr-b4rt0wsk1㉿kali)-[~]
└─$ cd cloudgoat

┌──(mr-b4rt0wsk1㉿kali)-[~/cloudgoat]
└─$ pip3 install -r ./requirements.txt

...SNIP...

┌──(mr-b4rt0wsk1㉿kali)-[~/cloudgoat]
└─$ chmod +x cloudgoat.py
There are a couple of config commands that the CloudGoat docs say will “save us time”. That’s pretty vague, but if we run the commands, we can see that a config file is created with the default AWS profile we want to use along with a file to store IP addresses for whitelisting.
					┌──(mr-b4rt0wsk1㉿kali)-[~/cloudgoat]
└─$ ./cloudgoat.py config profile
No configuration file was found at /home/mr-b4rt0wsk1/cloudgoat/config.yml
Would you like to create this file with a default profile name now? [y/n]: y
Enter the name of your default AWS profile: default
A default profile name of "default" has been saved.

┌──(mr-b4rt0wsk1㉿kali)-[~/cloudgoat]
└─$ ./cloudgoat.py config whitelist --auto
No whitelist.txt file was found at /home/mr-b4rt0wsk1/cloudgoat/whitelist.txt

CloudGoat can automatically make a network request, using https://ifconfig.co to find your IP address, and then overwrite the contents of the whitelist file with the result.
Would you like to continue? [y/n]: y

whitelist.txt created with IP address [REDACTED]

┌──(mr-b4rt0wsk1㉿kali)-[~/cloudgoat]
└─$ cat config.yml
- default-profile: default
Creating and Destroying a Scenario
At this point, all of the install and config should be completed, so why not try to spin up a scenario and see if it works? We’ll do this with the first scenario listed, vulnerable_lambda. We won’t actually start working on completing the scenario, but we’ll use it to verify we’ve set up everything correctly.
					┌──(mr-b4rt0wsk1㉿kali)-[~/cloudgoat]
└─$ ./cloudgoat.py create vulnerable_lambda
Using default profile "default" from config.yml...
Loading whitelist.txt...
A whitelist.txt file was found that contains at least one valid IP address or range.

Initializing the backend...

Initializing provider plugins...

...SNIP...

Apply complete! Resources: 8 added, 0 changed, 0 destroyed.

...SNIP...

[cloudgoat] Output file written to:

    /home/mr-b4rt0wsk1/cloudgoat/vulnerable_lambda_cgideisle8a6iw/start.txt
So what all just happened? A lot of output was printed to the console that I omitted 1) because it’s lengthy and 2) it outputs some sensitive information such as my AWS account ID and the secret access keys it created for the scenario. This output is mainly coming from Terraform, which is responsible for taking all of the input from the .tf files found in ~/cloudgoat/scenarios/vulnerable_lambda/terraform and creating the AWS infrastructure for the scenario.
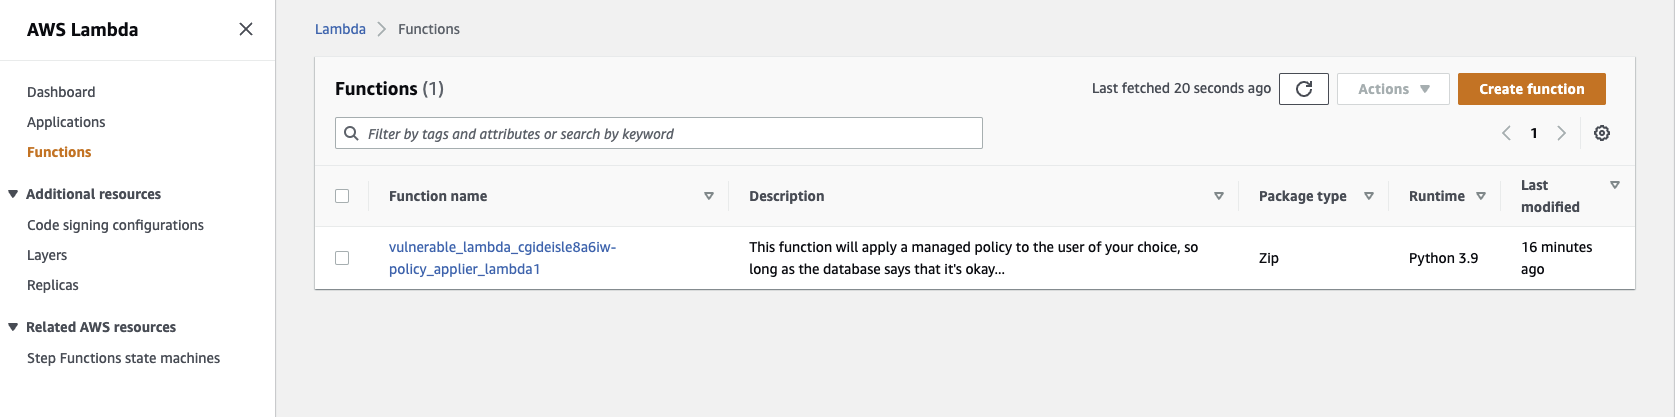
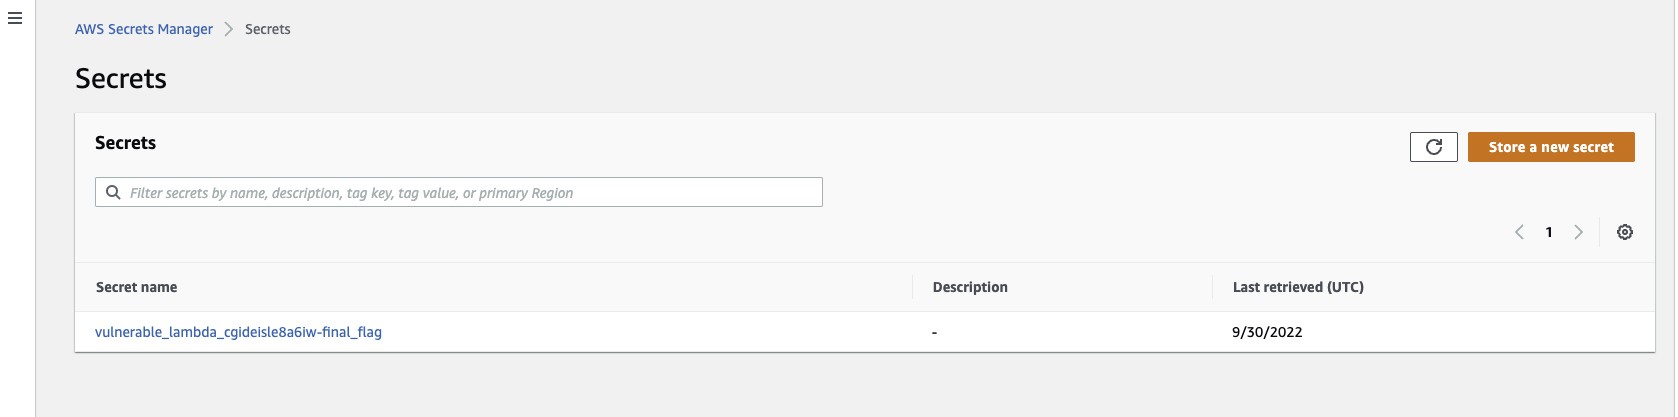
You can verify this by navigating through your AWS console and looking at the resources it created. I noticed that, despite putting my preferred region in the config profile, CloudGoat may create resources in a different region. If you can’t find a resource in the console, try switching regions until you do. Here, I’m showing the “bilbo” user, Lambda function, and secret as an example.
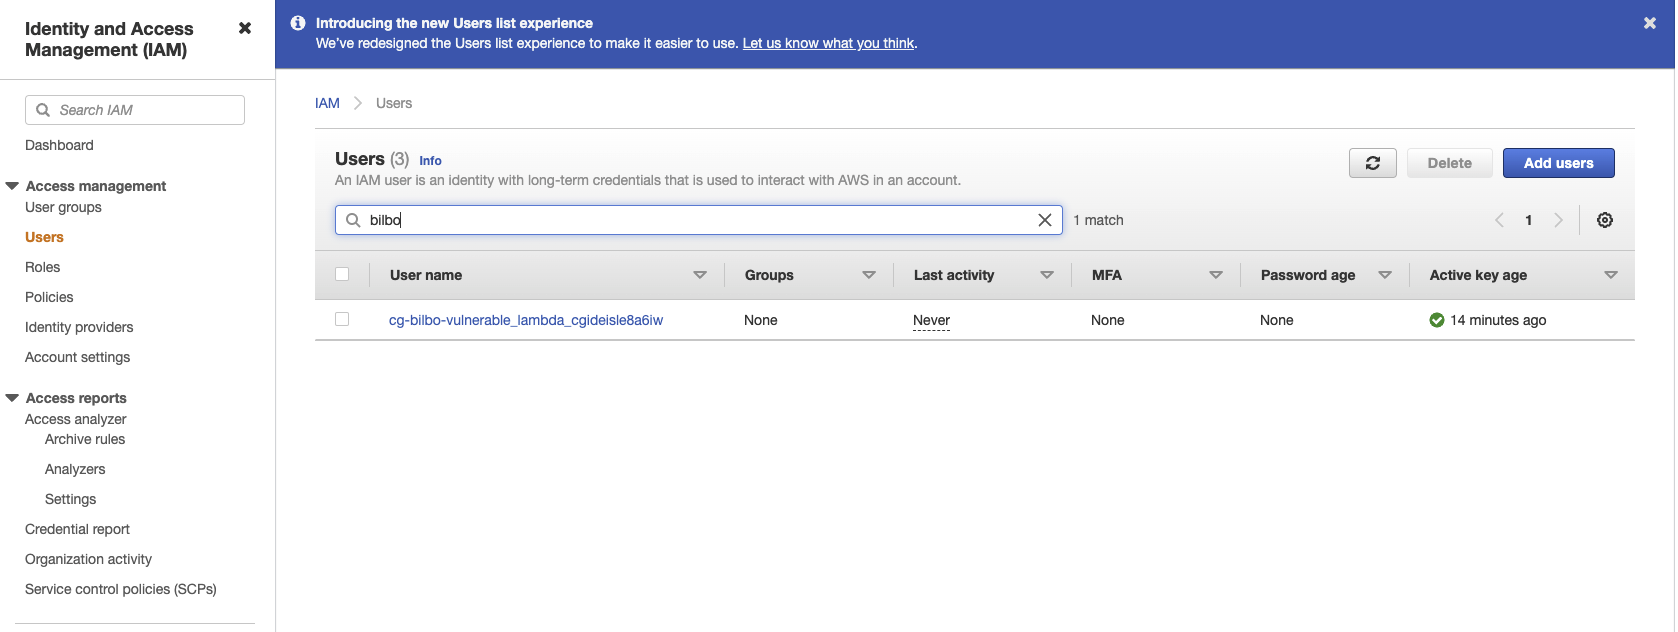
You’ll also notice that it wrote a file called start.txt to your VM. This is the starting point of the scenario. In the case of vulnerable_lambda, it gives the access key for a user named “bilbo”.
Also, note that each time you create a scenario, it assigns it a unique scenario ID.
Also, note that each time you create a scenario, it assigns it a unique scenario ID.
The next thing we’ll do is take down the scenario. I recommend doing this each time you’re finished using it 1) so that you don’t accumulate any associated costs with continuously running the infrastructure and 2) it’s just a good idea to take down vulnerable infrastructure when it’s not in use. You can list all of the deployed scenarios to aid with this.
					┌──(mr-b4rt0wsk1㉿kali)-[~/cloudgoat]
└─$ ./cloudgoat.py list deployed

  Deployed scenario instances: 1

    vulnerable_lambda
        CGID: cgideisle8a6iw
        Path: /home/mr-b4rt0wsk1/cloudgoat/vulnerable_lambda_cgideisle8a6iw
Here we can see that there is one scenario, which is the one we want to destroy. Note that CloudGoat only destroys the resources it creates. If you create anything else during the course of working on a scenario, you’ll need to remove it yourself, since it doesn’t exist in the scenario’s .tf files. Once everything is destroyed, it will move the files to a trash directory.
					┌──(mr-b4rt0wsk1㉿kali)-[~/cloudgoat]
└─$ ./cloudgoat.py destroy vulnerable_lambda
Using default profile "default" from config.yml...
Destroy "vulnerable_lambda_cgideisle8a6iw"? [y/n]: y

...SNIP...

Destroy complete! Resources: 8 destroyed.

[cloudgoat] terraform destroy completed with no error code.

Successfully destroyed vulnerable_lambda_cgideisle8a6iw.
Scenario instance files have been moved to /home/mr-b4rt0wsk1/cloudgoat/trash/vulnerable_lambda_cgideisle8a6iw
Once again, you can use the AWS console to view resources and verify that they are no longer there. With that, we’ve successfully set up CloudGoat!
Stay tuned for the next post where we will take a crack at the first scenario.
Stay tuned for the next post where we will take a crack at the first scenario.